Using the new features of arduino 12.
There is much that is new in the new arduino. Most of it in the user libraries and all of it good. My favorite is the addition of the ability to specify a different programmer as long as its avrdude approved.
boards.txt and programmers.txt
If you select the boards on my Arduino setup it will look very different than the stock Arduino.
In the arduino software folder you will find the boards.txt in a folder under hardware. To add a board you copy one of the existing entries and modify it to fit your board. The sample I use here is from the Sanguino, a mega 644P based arduino “core” (see www.sanguino.cc for instuctions on installing this core with arduino 12).
##############################################################

sanguino.name=Sanguino W/ bootloader

sanguino.upload.using=bootloader
sanguino.upload.protocol=stk500
sanguino.upload.maximum_size=63488
sanguino.upload.speed=38400

sanguino.bootloader.low_fuses=0xFF
sanguino.bootloader.high_fuses=0xDC
sanguino.bootloader.extended_fuses=0xFD
sanguino.bootloader.path=atmega644
sanguino.bootloader.file=ATmegaBOOT_644.hex
sanguino.bootloader.unlock_bits=0x3F
sanguino.bootloader.lock_bits=0x0F
sanguino.build.mcu=atmega644P
sanguino.build.f_cpu=16000000L
sanguino.build.core=sanguino
sanguino.verbose=false
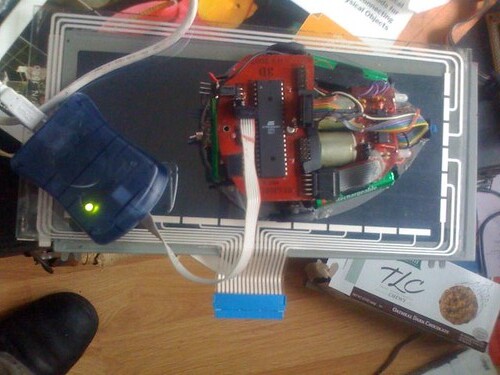
I have a maze following mouse that I built a year and a half ago that uses the atMega644V which is very similar to the 644P, after looking at the underlying code and seeing that it is written well enough to adjust to the differences between the two chips (mostly an extra serial port), I was pretty sure that the code would compile and run on the older chip. So I modified the board entry to match my board.
##############################################################

megmouse.name=MegMouse W/ avrispmkII

megmouse.upload.using=avrispmk2
megmouse.upload.maximum_size=63488
megmouse.upload.speed=38400

megmouse.bootloader.low_fuses=0xFF
megmouse.bootloader.high_fuses=0xDC
megmouse.bootloader.extended_fuses=0xFD
megmouse.bootloader.path=atmega644
megmouse.bootloader.file=ATmegaBOOT_644.hex
megmouse.bootloader.unlock_bits=0x3F
megmouse.bootloader.lock_bits=0x0F
megmouse.build.mcu=atmega644
megmouse.build.f_cpu=8000000L
megmouse.build.core=sanguino
megmouse.verbose=false
The first chunk in each entry is the category or class of the board and groups the text entries together. I wont pretend to be a java programmer and understand how it works just that the above works.
The important changes needed were in the .build lines where I changed the mcu, the clock speed and the core (location of the core source). These are used to compile the program with avr-gcc.
The other noticable change is the .upload.using line which is new in arduino 12. (see http://arduino.cc/en/Main/ReleaseNotes)
(If you can find the the preferences.txt you will see that this is usually set to bootloader.)
The value here coresponds to an entry in programmers.txt which was added in 10 to support burning bootloaders. My entry for the mark 2 looks like this.
avrispmk2.name=avrispmk2
avrispmk2.communication=usb
avrispmk2.protocol=stk500v2
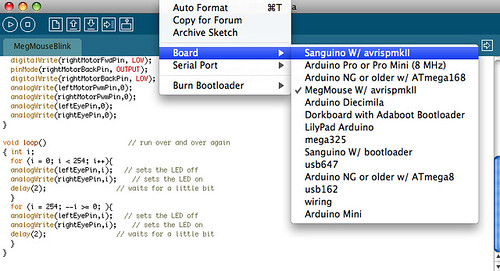
To load the new board and programmer I quit out of arduino and start it up again. Now when I look at my boards I see the new entry in the menu. Selecting this board will compile arduino’s libraries using the new target. Selecting verify will compile your code. This code will give meg deamon eyes.
/*
 * evil MegMouse eyes
 */

int leftMotorFwdPin=11;
int rightMotorFwdPin=9;
int leftMotorBackPin=8;
int rightMotorBackPin=10;
int leftMotorPwmPin=12;
int rightMotorPwmPin=13;
int rightEyePin=14;
int leftEyePin=15;

void setup()                    // run once, when the sketch starts
{
  pinMode(leftMotorFwdPin, OUTPUT);      // sets the digital pin as output
  digitalWrite(leftMotorFwdPin, LOW);      // sets the digital pin as output
  pinMode(leftMotorBackPin, OUTPUT);      // sets the digital pin as output
  digitalWrite(leftMotorBackPin, LOW);      // sets the digital pin as output
  pinMode(rightMotorFwdPin, OUTPUT);      // sets the digital pin as output
  digitalWrite(rightMotorFwdPin, LOW);      // sets the digital pin as output
  pinMode(rightMotorBackPin, OUTPUT);      // sets the digital pin as output
  digitalWrite(rightMotorBackPin, LOW);      // sets the digital pin as output
  analogWrite(leftMotorPwmPin,0);             // turn motor pwm off.
  analogWrite(rightMotorPwmPin,0);
  analogWrite(leftEyePin,0);                       // turn led pwm off.
  analogWrite(rightEyePin,0);
}

void loop()                     // run over and over again
{ int i;
  for (i = 0; i < 254; i++){
  analogWrite(leftEyePin,i);
  analogWrite(rightEyePin,i);    // fade eyes to on
  delay(2);
  }
  for (i = 254; --i >= 0; ){
  analogWrite(leftEyePin,i);   //
  analogWrite(rightEyePin,i);    // fade them to off
  delay(2);
  }
}
And the upload button will pass the parameters from your modified programmers.txt to avrdude and use the external programmer rather than requiring a bootloader and a reset.