Note: This work is ongoing see the Benito info page for current info…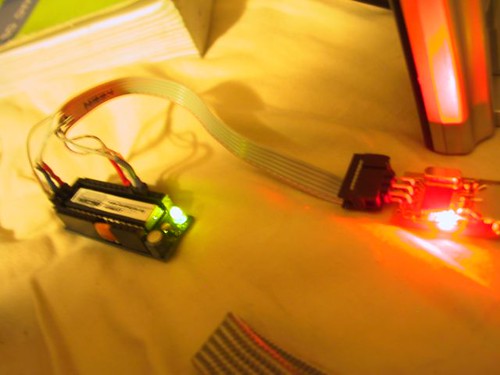
SPI4 is a MyUSB based firmware for the at90usb family of processors.
This program is the core of a programmer that I am working on which uses the Benito board to do in circuit programming (ISP) on the Atmel AVR and 8X51 microcontrollers. It uses the the a feature of atmels USART module called “Master SPI Mode” as described in Atmel’s Application Note #317 (http://www.atmel.com/dyn/resources/prod_documents/doc2577.pdf) (1). The MegaXX8 family and the at90usb series of chips all support this feature.
Setting up the USART
The USART is configured by setting the Uart Mode SELect bits in the UCSRxC register, setting the TXEN and RXEN bits in UCSRxB, and setting the Baud Rate Register (UBRRx)
/* Setup USART1 in master SPI mode */

UBRR1 = 0; /* apparently this needs to be 0 during setup */

UCSR1B = (1<<RXEN1) | (1<<TXEN1);

UCSR1C = (1<<UMSEL11) | (1<<UMSEL10);

/* Calculated value from appnote code. ((CPUFREQ/(2*BPS))-1) */

UBRR1 = ((F_CPU/(20000))-1);
The USART takes care of setting the direction of the MOSI and MISO pins but you are responsible for putting the Clock pin into output mode.
 SPI_CLK_PIN_DDR  |=  _BV(SPI_CLK_PIN);

// SPI_CLK_PIN_PORT |= _BV(SPI_CLK_PIN); // if a known state is needed
If you are using the slave select mechanism you will also need to assign a pin to do the slave select and set it to output mode. On the slave system the SPI pins will tri-state until SS is pulled low.
 SPI_SS_PIN_DDR  |=  _BV(SPI_SS_PIN);

SPI_SS_PIN_PORT |= _BV(SPI_SS_PIN); // PULL Slave Select  HIGH
Writing and Reading the data.
Reading and writing the USART in this mode is almost identical to serial transmission with one exception. As the serial is clocked out of the data register incoming data is clocked in.
/*-----------------------------------------------------------------spiOut(value)

* Moves the a byte to SPI and  read one back.

*-----------------------------------------------------------------------------*/
unsigned char spiOut(unsigned char value) {
// Wait for empty transmit buffer.
do {} while( (UCSR1A & (1<<UDRE1)) == 0 );
// Send data.
UDR1 = value;
// Wait for transfer to complete and return received value.
do {} while( (UCSR1A & (1<<RXC1)) == 0 );
return UDR1;
}
SPI4: a USB(serial) to SPI converter
The attached code contains a MyUSB based program called SPI4 it is complete in that it contains copies of the MyUSB library files used. It contains an X-Code project and a make file. If you have an avr-gcc toolchain and dfu-programmer you can “make program” or you can build the xcode project with the program target. It has been tested against the benito at90usb162 board (which you can purchase here or through the dorkbotPDX group order) but should run with minor modifications on the USBKey.
ReadChip: Using the USB to SPI converter.
In the ReadChip directory in the attached code there is an example of reading the signature and fuse bits on an AVR. It is currently built only for the mac but if you bracketed the /* >>> Mac Specific >>>>> */ parts of the code with #ifdefs for your posix platform (anything not redmond based). It should port just fine.
After opening the serial port as a stream write then read a byte at a time. All avr SPI/ISP interactions are done 4 bytes at a time; usually with the second or third return byte being the sync byte and the third and or fourth bytes being the return value.
static int doTheOldInOut (int fileDescriptor, char *inBuff, char *outBuff) {

int i=0;

for (i=0;i<4;i++) {

 if (write(fileDescriptor, outBuff+i, 1)>0) {

  //debug           printf(">%02X>n",outBuff[i]&0x000000ff);

  if ((read(fileDescriptor, inBuff+i, 1)>0)){

   //debug              printf("<%02X<",inBuff[i]&0x000000ff);

  } else {

   printf("Error reading from Device - %s(%d).n", strerror(errno), errno);

   continue;

  }

 } else {

  printf("Error writing to Device - %s(%d).n", strerror(errno), errno);

  continue;

 }

}

return 1;

}
To read the fuses for example send the four bytes {0x50,0x00,0x00,blah} (where the last byte doesnt matter) and check to make sure that the first byte is echoed back;
doTheOldInOut(fileDescriptor, inBuff, kGetLowFuseBits);

if (inBuff[1]==0x50){

  FuseLow=inBuff[3]&0x000000ff;

}
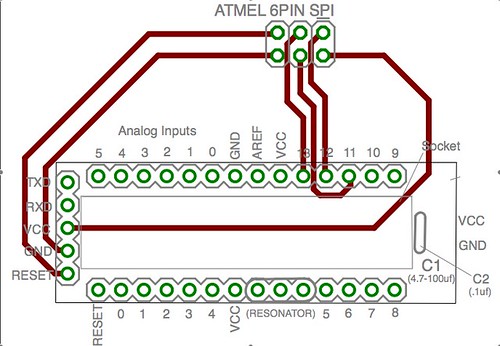
To wire the benito to the dorkboard or another arduino based board use the following configuration. The center 6 pins of the Benito7(rev g) form a standard atmel 6pin programming header.
Output.
Try #1
Resetting Target
Looking for Sync

Got Sync!

ISP initialized successfully.
Signature[1]=1E
Signature[2]=94
Signature[3]=06
FuseLow=FF
FuseHigh=DD
FuseExtended=F8
LockBits=CF
ISP port closed.
Source
See Also:
- Dean Camera’s excellent MyUSB Library (http://www.fourwalledcubicle.com/MyUSB.php)
- The TDI Products Page (http://tempusdictum.com/tdproducts.html)
Footnotes:
(1) The original benito design exposed the serial pins on portd and the SPI pins from port B. The final rev of the Benito7(g) takes this mode into consideration and exposes all of port D instead.