by on Avr DevelopmentDorkbot

das blinkin

das blinkin

With a lot of my projects I have done my prototyping with Paul Stoffregon’s Teensy series of boards before moving them onto their own codebases. On those occasions where the “prototype was all I needed” I would compile the code using the teensyduino and then manually load the .hex file onto the target. As I am looking at using the arduino for more projects I decided to take a look at how paul interacts with the Arduino IDE and see if I could load code directly onto my chips.

boards.txt

The arduino allows for different chips and configurations through the boards.txt and the programmers.txt files. Each configuration usually will also have a “core” which maps the pins and handles the particulars of that chip. When you run paul’s teensyduino installer it adds several entrys to the boards.txt file including the entry below.

teensy_ser.name=Teensy 1.0 (USB Serial)
teensy_ser.upload.protocol=halfkay
teensy_ser.upload.maximum_size=15872
teensy_ser.upload.speed=38400
teensy_ser.upload.disable_flushing=true
teensy_ser.upload.avrdude_wrapper=teensy_reboot
teensy_ser.build.mcu=at90usb162
teensy_ser.build.f_cpu=16000000L
teensy_ser.build.core=teensy_serial
teensy_ser.build.post_compile_script=teensy_post_compile
teensy_ser.name=Teensy 1.0 (USB Serial)
teensy_ser.upload.protocol=halfkay
teensy_ser.upload.maximum_size=15872
teensy_ser.upload.speed=38400
teensy_ser.upload.disable_flushing=true
teensy_ser.upload.avrdude_wrapper=teensy_reboot
teensy_ser.build.mcu=at90usb162
teensy_ser.build.f_cpu=16000000L
teensy_ser.build.core=teensy_serial
...
Looking at pauls additions to the boards.txt I see that he is using the teensy_serial core  that he has written to create a simple usb to serial interface and to map the usb avr pins and other peripherals to the arduino conventions. He is also adds an entry to the arduino uploader class which lets him use a wrapper for avrdude which lets him use his proprietary bootloader. This wrapper is installed by the Paul’s installer and  lives in the Arduino’s bin directory. After looking to see if this wrapper was a script I replaced the entry in the boards.txt and put a script into the bin directory called “dfume”, after seeing that my replacement wrapper worked I added two new entries for each class of avr that I wanted to use the atmega32u2 and the atmega32u4
#############################################################
fouryou.name = atMega32U4
fouryou.upload.protocol=atmega32u4<
fouryou.upload.maximum_size=32256
fouryou.upload.speed=38400
fouryou.upload.disable_flushing=true
fouryou.upload.avrdude_wrapper=dfume
fouryou.build.mcu=atmega32u4
fouryou.build.f_cpu=16000000L
fouryou.build.core=teensy_serial
#############################################################
tooyou.name = atMega32u2
tooyou.upload.protocol=atmega32u2
tooyou.upload.maximum_size=32256
tooyou.upload.speed=38400
tooyou.upload.disable_flushing=true
tooyou.upload.avrdude_wrapper=dfume
tooyou.build.mcu=at90usb162
tooyou.build.f_cpu=16000000L
tooyou.build.core=teensy_serial
#############################################################

fouryou.name = atMega32U4
fouryou.upload.protocol=atmega32u4
fouryou.upload.maximum_size=32256
fouryou.upload.speed=38400
fouryou.upload.disable_flushing=true
fouryou.upload.avrdude_wrapper=dfume
fouryou.build.mcu=atmega32u4
fouryou.build.f_cpu=16000000L
fouryou.build.core=teensy_serial

#############################################################

tooyou.name = atMega32u2
tooyou.upload.protocol=atmega32u2
tooyou.upload.maximum_size=32256
tooyou.upload.speed=38400
tooyou.upload.disable_flushing=true
tooyou.upload.avrdude_wrapper=dfume
tooyou.build.mcu=at90usb162
tooyou.build.f_cpu=16000000L
tooyou.build.core=teensy_serial

I started with a blank script that just printed the arguments passed to the wrapper and then called it by restarting my Arduino (to reload the boards.txt) And then selecting one of the new boards and “Uploading” my code. This gave me a window to interactively work through my script. Since the avrdude_wrapper code just pretends to be an avrdude most of the script is munging the arguments passed to avrdude to get the commands to pass to dfu-programmer.

#!/usr/bin/perl
use Getopt::Std;
print @ARGV;
my %args;
my $hexfile;
my $dfu = "/usr/local/bin/dfu-programmer";
my $cpu;
my $hexfile;

getopt('pUc',%args);
$hexfile=$args{U};
$hexfile =~ s/flash:w://;
$hexfile =~ s/:i//;
$cpu=$args{c};

print "n[" . $hexfile . "]";
print "n[" . $cpu . "]n";
print "$dfu $cpu erasen";
system "$dfu $cpu erase";
print "$dfu $cpu flash $hexfilen";
system"$dfu $cpu flash $hexfile";
print "$dfu $cpu startn";
system "$dfu $cpu start 1>&2";
print "n";
 

There is one tricky bit. The current avr-gcc doesnt support the atmega32u2 correctly but the code for the at90usb162 is binary compatible so the build.mcu is set to the at90usb162. But then dfu-programmer supports the correct chip and wont find the device so we use the fact that the upload.protocol argument is passed directlyalong using the -c argument and everything works fine.

So now we just use the hwb and reset buttons to get the system into dfu mode and upload our code directly from the arduino. Its not as slick as the teensy in “auto” mode but it works.

by on Avr Development

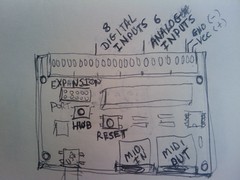
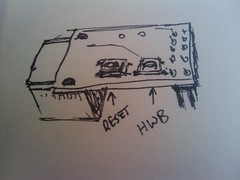
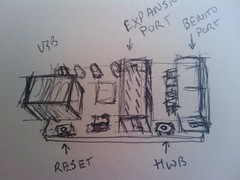
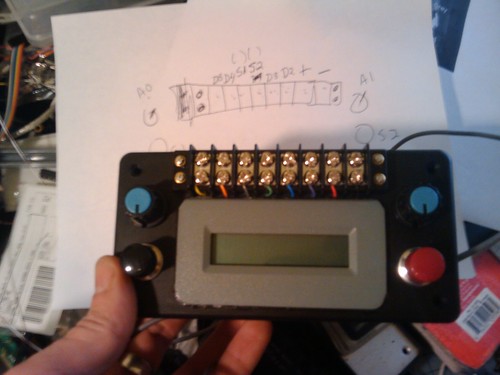
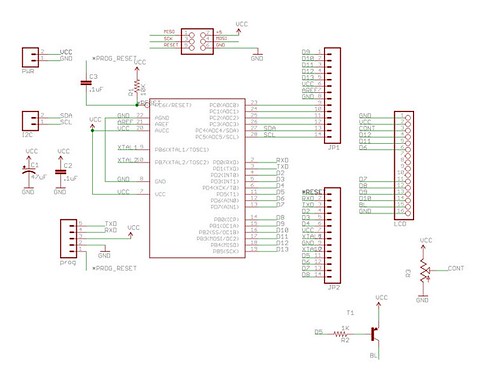
The testbox is an LCD/Dorkboard based arduino clone with two buttons and a pair of potentiometers. The switches, power and 4 io pins are made avaliable via screw terminals on the ouside of the testbox.


#include
/*--------------------------------------------------------------
pulse generator for test box

Depending on the setting of left dial send send pulses out on digital ouput pin 2
at between 1 and 122 hz when left button is pressed.
the lcd should show the hz and the number of pulses sent.

*/

//defines for analog "dial" pins.
#define D1PIN 0
#define D2PIN 1
//defines for switches
#define S1PIN 17
#define S2PIN 16
// other pins avaliable for testbox 2, 3, 4, 13
#define PULSEPIN 2

// defines for smooting (nsamples) and debounce (milliseconds)
#define SMOOTHING 16
#define DEBOUNCE 50

//defines to map pins to lcd
#define D4 7
#define D5 8
#define D6 9
#define D7 10
#define RW 11
#define E 6
#define RS 12
#define BL 5

LiquidCrystal lcd(RS, RW, E, D4, D5, D6, D7);

int d1 = 0, d2 = 0, s1=0, s2=0;

/* variables for debouncing switches and knobs */
int s1reading = 0 , s1previous = 0;
long int d1sum = 0, d2sum = 0, s1time=0;
int samples = 0;

volatile int overflowcount;
volatile int pulsecount;
volatile int pinstate=HIGH;

ISR(TIMER2_OVF_vect) {
if (s1) {
if (++overflowcount > d1) {
overflowcount=0;
pinstate=!pinstate;
digitalWrite(PULSEPIN,pinstate);
if ( pinstate ) {
pulsecount++;
}
}
}
}

void setup()
{ overflowcount = 0;
pulsecount = 0;

delay(1000);

lcd.begin(2,16); // Print a message to the LCD.
pinMode(S1PIN, INPUT);
digitalWrite(S1PIN, HIGH);
pinMode(S2PIN, INPUT);
digitalWrite(S2PIN, HIGH);
lcd.setCursor(0,0);
lcd.print(" ");

TCCR2A = 0; //freerunning timer 2
TCCR2B = (CS21|CS22); //divide clock by 256
TIMSK2 = TOIE1; //enable timer2 terrupt

}

void loop()
{

s2 = !digitalRead(S2PIN); //read s2 for grins or DEBOUNCE as below.

//DEBOUNCE s1
s1reading = digitalRead(S1PIN);

// If the switch changed, due to bounce or pressing...
if (s1reading != s1previous) {
// reset the debouncing timer
s1time = millis();
}

if ((millis() - s1time) > DEBOUNCE) {
if (s1 == s1reading) { // if DEBOUNCEd reading is a change
s1=!s1reading;
if (s1) {
pulsecount=0;
}
}
}
s1previous = s1reading;

d1sum += analogRead(D1PIN);
d2sum += analogRead(D2PIN);
if (++samples > SMOOTHING) { //when i have SMOOTHING samples then average them.
d1sum /= SMOOTHING;
d2sum /= SMOOTHING;

d1=map(d1sum,0,1023,0,122); //map dial to what you want values to be
d2=map(d2sum,0,1023,0,300);

samples=0;
d1sum = 0;
d2sum = 0;
}

lcd.setCursor(0,0);
lcd.print("Rate: ");
lcd.setCursor(6,0);
lcd.print(122-d1);
lcd.print("Hz ");

lcd.setCursor(0,1);
if (s1) {
lcd.print("ON ");
} else {
lcd.print("OFF");
}
lcd.setCursor(6,1);
lcd.print("# ");
lcd.setCursor(8,1);
lcd.print(pulsecount);
}

by on Avr Development

Getting code onto the MidiMonster or Benito device.

Midi Monster Button Locations.

Midi Monster Button Locations.

Benito 7g Switch Positions.

Benito 7g Switch Positions.

Benito 2010 Switch Locations

Benito 2010 Switch Locations

Benito Without Buttons.

Benito Without Buttons.

All of the code on the Benito and MidiMonster devices is open source and references an open source library called the Lightweight Usb For Avr (lufa). Getting the code compiled and onto the device requires a few other open source tools.

AVR-GCC

The most current and stable release of the toochain for the AVR has untill recently been maintained by Eric Wedddington and released as WinAvr (http://sourceforge.net/projects/winavr/) Winaver integrates nicely into atmels avr studio http://www.atmel.com/dyn/Products/tools_card.asp?tool_id=2725 and I reccomend that you get both if you are running windows. Each Winavr Release is closely followed by objective developments CrossPack for avr http://www.obdev.at/products/crosspack/index.html and a script for building the current toolchain on linux which is hosted by AvrFreaks at present there is also a debian package that was put out last month http://www.avrfreaks.net/index.php?name=PNphpBB2&file=viewtopic&t=90172

HWB? DFU?

Most Atmel “atmega” devices have a pin dedicated to determining weather or not the device goes into the bootloader depending on the devices flag settings. This pin is labled HWB (for hardware boot) on most of  the datasheets. The usb avr family has this mode set up by default. When you hold the hwb pin low and reset the device it goes into the bootloader. On these devices the built in bootloader uses a usb device class called the Device Firmware Uploader (DFU). Atmel provides a tool called flip for programming DFU devices on  windows and linux. There is an open source programmer called dfu-programmer http://dfu-programmer.sourceforge.net/

That other guys stuff.

Those of you who have worked with the teensy boards from paul stoffregon will notice some subtle differences. Paul wrote his own (closed source) bootloader rather than use the bootloader tha comes installed on the chips. Then he uses a hardware trick similar to the auto reset hack to make a single button manipulate both the reset and the hwb pins to put his boards into the bootloader. I didnt feel that either the two button arrangement or the builtin bootloaders were broken so I like most people working with these chips dont fix them.

Using the dfu-programmer

All of the programs in Dean Cameras Lightweight Usb for Avr have a “dfu” target. Once you have the target into the DFU mode you can simply

$make dfu

This will cause the dfu-programmer to erase the flash reprogramm it with a new hex file and restart the chip. You can also do this manually with the following commands

$dfu-programmer atmega32u2 erase
$dfu-programmer atmega32u2 flash mycode.hex
$dfu-programmer atmega32u2 start

This will cause the dfu-programmer to erase the flash reprogramm it with a new hex file and restart the chip.

by on Avr DevelopmentDorkbotosx-avr

What: Focused workshop: programming Midi devices using the Lightweight Usb For AVR library (Lufa) and the MidiMonster.

When: Sunday 28 Feb 2010 1-5 pm.

Where: PNCA (NW 12th and Johnson) #205

Cost: $35 (includes Midi Monster)
(If you have a MidiMonster from the PD Workshop and wish to use it please bring $10)

Materials: you Should Bring, a laptop and a mini usb cable. Please install Arduino >16 as well.

In this workshop we will be going through the firmware built by Alex Norman as an example of how to develop midi devices using the avr microcontoller. Topics covered will include:

  • The Midi Specification
  • The USB Midi Specification
  • The Lightweight Usb for AVR  library.
  • Programming the avr using avr-gcc

To reserve a place in the class please rsvp at http://tempusdictum.com/tdproducts.html

by on Mac Development

Disks Die, Laptops break, Bags are Stolen.

It’s more or less a fact of life,

In the 4 year process of transitioning from a noisy sun E-250 in the garage to something that could actually be in the same room with you I arrived at the above network arrangement.

Most of the my data is hosted by a central server and when I had more systems all of the home directories were NFS mounted (which is a major PITA on OSX). In the last hear I have worked primarily on my MacBook, occasionally syncing my projects with the file server. After migrating to leopard I purchased a 1 Terabyte external disk and backed up both the file server and my laptop using “Time Machine”. As I worked more and more on the laptop I did less and less syncing of the work to the file server. The thing about time machine is that its thoughtless. Set it up and as long as you get your laptop home and leave it on for a few hours and it should keep your work safe for you.

Two weeks ago My Bag was stolen.

On top of the work I had actively been doing I lost two active sketchbooks and in the end this loss is probably the most painful. Since I couldn’t immediately restore the data using the process described below, I spent much of last week recreating the designs for this months workshops. Once the critical work was done I turned to see what I could recover. I had used time machine to restore a couple of files I had foobared but I had never had to restore all 270G of data and applications. My Intel Imac did not have enough disk nor did it have most of the software. So I bought a 1T disk from Old Town Computers and “CarbonCopyCloner“ed a bootable operating system onto it and put it into my Intel Imac (Ernesto).

WHERE’S MY BACKUP?!?

After googling around I found that I was supposed to restore my files using the “Migration Assistant” tool. I had used migration assistant to move users and applications to new systems but never to restore files. When I first tried the migration assistant I mounted the disk remotely but I couldn’t see the backup. So I moved the disk to the target machine. Even then I only saw the option of restoring the server and not my laptop.
Panic set in until I found a file named with my laptops name and a .sparsebundle extension. Right clicking on this lets me open it with the appropriate mounting utility. But…. Not until it had checked the file system. Walking away and doing something else for a few hours let me come back to the image mounted. When I ran the migration assistant again the option of restoring the laptop was there.

SUCCESS!

Starting the restore process and going to sleep I woke to find that it had successfully restored all of my data and applications! I was only out the extra time on the designs and the actual property.

FAIURE.

Now all of my active work was on a disk which was large enough to also contain the rest of my images/music/video and web content which had been kept on the file server. Since I could see the fileserver’s backup and I was so happy with my success I tried then to restore the file server data.

Mounting your home directories on external disks on OSX is a lot like mounting them remotely. It just plain sucks. Half the time if I made any changes in the disks connected to the file server it would mount them in a different place. Then when you logged in it would create a new mount point and empty directory and you could not remount the disk where it was supposed to be until you removed the new directory.

When I restored the file server user I had few options. I could restore the user (giving an estimated size of like 20 meg , not the >400G I expected) and on the next screen I could restore the file system at the top level directory. This did not show me enough data to represent the data directory either. I could also have restored the entire system and then re-restored the Intel files over it but I really didn’t want to deal with the mess.

So I punted.

I just plugged the file server disk in and dragged my home folder to the new disk. I will probably test the restore process to the file server with the external disk attached to make sure the data is recoverable on that system. Once this is done I will reformat the time machine disk for future backups and send the file servers external disk to another state. In the mean time I will rest better knowing that my time machine backups actually work transparently while I work.

by on Mac Development

I was finally able to get my ruby/rails environment setup with my database of choice.

It wasnt easy as postgres will not build with more than one architecture at a time, I had gone through similar hell the last time I tried to build anything on OSX that had to compile against libraries made for different architectures. Fortunately the solution was relatively simple.

My database is running 64 bit and I use it for many other applications that are compiled against either multiple architectures including 64bit but also some which are 64 bit only.

Ruby on the other hand is compled for 32 bit which worked flawlessly on mysql and most of the other gems i installed when I got to the postgres it puked in weird ways and when I tried every third solution on the net it was always the same.

Bash-3.2# gem install pg
Building native extensions.  This could take a while...
ERROR:  Error installing pg:
ERROR: Failed to build gem native extension.

The bottom line from one of the only success stories that I found on the net was that you either built everything 64bit or nothing. Easy enough if you want to build all of your dependencies by yourself. The whole point of gems is to have the tools work for you. I wasnt really able to figure this out in the web full of people beating their heads on the same problem each harder than the other and each reaching the same it doesnt work conclusion but I had the fortune of getting completely away from the web long enough to realize that only the client and libraries needed to match the architecture and since all interaction between rails and the database went through a socket the architecture of the client didn’t have to be the same as the database.

so going back to my postgres source tree i did a

...postgresql-8.3.6# make distclean

and then reconfigured the database using the prefix /usr/local32

..postgresql-8.3.6# ARCHFLAGS='-arch i386' ./configure --prefix=/usr/local32/

Then I just had to tel ruby/gem to use the 32 bit libraries. Since ruby uses pg_config I made sure that the 32bit version is in the path first.

# PATH=/usr/local32/bin/:$PATH ARCHFLAGS='-arch i386' 
gem install pg  -- --with-pgsql-dir=/usr/local32/

And we are off but my god what at PITA.

by on Dorkbotelectronics

At the eagle for fabrication workshop on sunday I started with a design that Thomas Lockney threatened to build about 2 years ago called the Low Fi Arduino Guitar Pedal.

(http://www.instructables.com/id/Lo_fi_Arduino_Guitar_Pedal/)

It was simple enough to get through the necessary parts of eagle that I was teaching and while it wasn’t perfect It beat the hell out of Craig Anderton’s circuits in terms of clarity and probability of actually working. To discuss from an over view perspective creating parts I decided to add the 1/4″ jacks from another great dorkbotpdx project from Hans Lindauer.

Once I got the library part together for the 1/4″ jack I had to rearrange things quite a bit but there was still pleanty of room. The next step was to add a power connector and a regulator. The idea is to be able to mount the resulting board in one of the cheapo danelectro pedels that I have around like this

In order to get the board to work out I had to create a new package for the potentiometers but I managed to get it all to fit on the board without resorting to surface mount components.

I will post the library example latere this evening.

by on Site News

As I am rebuilding our web server I am consolodating my nerdy stuff. This domain was origionally where I placed information on my installable package for the avr-gcc toolchain for OSX which came out of the stuff I was working on.