http://www.dorkbotpdx.org/workshop/arduino/cult_induction_rev8
http://www.dorkbotpdx.org/workshop/arduino/cult_induction_rev8
Recently I started using my linux laptop as my primary avr-usb development environment. When I upgraded the laptop to the current Ubuntu-LTS release (10.4 aka Lucid lynx) a bunch of stuff was broken including all of the wonderful udev rules provided by my linux savvy friends at dorkbotpdx.
I mean jeesh even lsusb was broken.
$ lsusb -vd "03eb:"|grep iM
cannot read device status, Operation not permitted (1)
iManufacturer           1
When I started looking at what changed and how to adjust, the web dead ended to a lot of threads like the one at http://ubuntuforums.org/showthread.php?t=1360412 ; where two people declared that having to escalate privileges to root in order to talk to a user device was “normal”. Even when the developer said it wasn’t normal the ubuntu folk redeclared it normal (apparently after Bush you just have to repeat something blatantly stupid for it to be true). As an administrator the last thing you want is everything and its dog requiring root privileges.
Hanging around the #ubuntu channel was a lot like having people repeat the searches on the web that provided me with the same dead ends that I joined the channel trying to resolve.
This was getting stupid. All I wanted to do was to have devices that I could plug in and program and then communicate with them using ruby or perl or some other haphazzardly thrown together scripts without having to be root. Then I realized once again that ubuntu is really focused on making the users life easier and that this leads to a lot of non technical help. So I asked my friends what the nick name was for the Debian release that was the basis for the Ubuntu release nick named “Lucid” and then re did all of my dead ended web queries replacing “Ubuntu Lucid” with “Debian Squeeze”.
The results were heavy on the technical detail and light on social skills.
More importantly I quickly found the solution that I needed in the middle of this link (http://git.zerfleddert.de/cgi-bin/gitweb.cgi/usb-driver?a=blob_plain&f=README&hb=HEAD) what I was missing was the difference between the new and the old udev rules.
“If you are running a newer version of udev (as in Debian Squeeze and
Ubuntu 9.10), you need to adapt the rules-file to the new udev-version:
sed -i -e ‘s/TEMPNODE/tempnode/’ -e ‘s/SYSFS/ATTRS/g’ -e ‘s/BUS/SUBSYSTEMS/’
/etc/udev/rules.d/xusbdfwu.rules”
One line of sed was all I needed and it had taken me a week of asking about lucid when i should have been asking about squeeze. With this I also was able to find the changes to the lay out of the /dev and /proc trees and the new tools to monitor udev and diagnose issues.
I really just wanted to change the permissions so I could use my devices. Adding the following udev rule to your system will do just that. You will also need to restart the udev service. Both of these will require you to be root.
# cat >/etc/udev/rules.d/98-all-your-atmel-belong-to-us.rules<<EOF
#------------------------/etc/udev/rules.d/98-all-your-atmel-belong-to-us.rules
#
# Make atmel devices (dfu, LUFA, obdev) accessible in userland
#
ACTION=="add", SUBSYSTEMS=="usb", ATTRS{idVendor}=="03eb", MODE="0666"
EOF
# service udev restart
To actually own all my atmel I could have also added ‘ ,USER=”don” ‘ after the mode part but I just wanted to talk my Atmel usb-avr devices and the open source firmware I was developing. And the above rule made things “just work”.
$ lsusb -vd "03eb:"|grep iM
iManufacturer           1 mycompany.com
$
This rule fixed all of my LUFA based devices including the my open source arduino programmer as well as the dfu programmer.used to code them. Hopefully it will be a while before I have to go through this again.
feurig: ax have you gotten anything to work with deans post feburary lufa?
[1:29pm] ax: post feb. hmm, i’d have to look into my project files to remember which version i was usting
[1:29pm] ax: just a sec
[1:29pm] feurig: I was pulling my hair out with the may release and then I went back to the standard “what ever ax was using” and things started working
[1:30pm] feurig: you used the feb19 release on the midimonster stuff
[1:30pm] feurig: where is that (explicitive deleted) tourist????
[1:34pm] ax: yeah, /lufa_100219/
[1:35pm] ax: i like this ‘whatever ax was using’ standard
[1:35pm] ax:
[1:48pm] bzztbomb: That should be a source control tag
Today, I am working on a cross platform USB device which I hope to interface with ruby, python, and perl using libusb. The ruby bindings for libusb are for 1.0.xx which actually almost works on OSX nowadays. A quick sampling of using ruby-usb on osx, like most things embedded in apple land, is a trip more or less to hell. (see: http://www.jedi.be/blog/2009/11/11/ruby-usb-libusb/ http://www.ruby-forum.com/topic/192042) . Since most of my ruby is gem installed I just need a working version of libusb so I go to the darwin ports recommended above. Looking at the “raw” port file I see that there are really only two patches and so I go find them. They aren’t exposed for reasons that seem pretty stupid to me, but I did find them at. http://libusb.darwinports.com/dports/devel/libusb/files/patch-libusb__io.c and http://libusb.darwinports.com/dports/devel/libusb/files/patch-libusb__os__darwin_usb.c
When I downloaded the source file and went to wget the patches it got even more screwey.
wget http://libusb.darwinports.com/dports/devel/libusb/files/patch-libusb__io.c
--2010-07-06 00:28:13--  http://libusb.darwinports.com/dports/devel/libusb/files/patch-libusb__io.c
Resolving libusb.darwinports.com... 208.185.168.32
Connecting to libusb.darwinports.com|208.185.168.32|:80... connected.
HTTP request sent, awaiting response... 403 Forbidden
2010-07-06 00:28:13 ERROR 403: Forbidden.
I didn’t want to deal with it so I just saved the links in my browser and patched the source files manually. After that a
./configure; make && make install && make clean
let me do the normal ruby thing.
gem install ruby-usb
Just like on all the other operating systems.
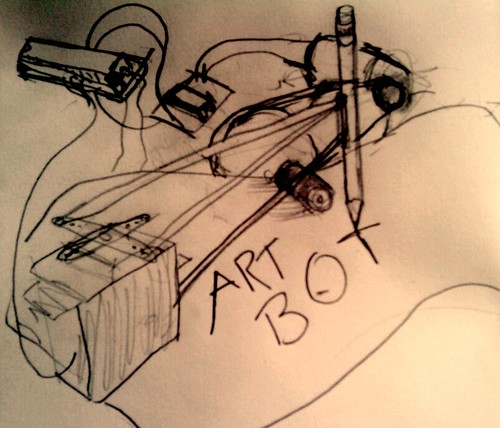
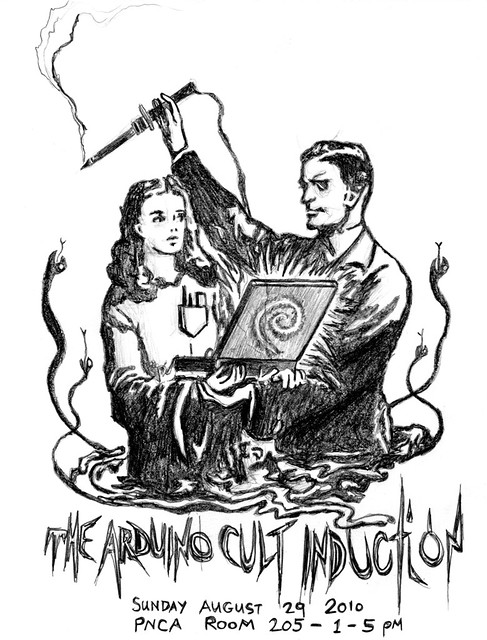
In this workshop we will be taking our dorkboards and using them to create a simple machine that draws. The focus will be on hands on problem solving.
What you will get.
What to bring:
Where:
PNCA — 1432 NW Johnson St, Room 205
When:
Sunday May 30nd from 1 to 5pm
You can also rsvp via email and bring cash but it is easier to plan and track the money if you use paypal.

What:
This workshop is an opportunity for 15 to 25 people to spend a week working on the fundamentals of integrating micro-controllers into the arts. At the end of the week participants should be able to build and program their own Arduino compatible micro-controller system and use it to interact with the physical world using motors servos lights relays and switches.
The workshop will be structured with a hands on approach. The theory being that we learn best by doing. The first two days will be devoted to building and programming the base platform and using it to control various devices. The remaining 3 days will be a lab devoted to incorporating the new tools into actual pieces. The cost of the course is $105 and includes the materials listed below as well as 5 days of hands on instruction.
What you will get.
What to bring:
When:
June 7th through June 11th from 1-5pm.
Where:
Object Space Gallery:
1818 1/2 E Sprague, Spokane WA
— or —
Mantras,
Tools
DS1306
Best code example is at .http://www.nearfuturelaboratory.com/2006/12/14/arduino-and-ds1306-real-time-clock/
only problem with sample code is that it only works in the full sp mode and the diagram on the page shows the other mode. (need a32khz crystal)
To Do:
Exchange for Tuesday
Give walt
To develope.

das blinkin
With a lot of my projects I have done my prototyping with Paul Stoffregon’s Teensy series of boards before moving them onto their own codebases. On those occasions where the “prototype was all I needed” I would compile the code using the teensyduino and then manually load the .hex file onto the target. As I am looking at using the arduino for more projects I decided to take a look at how paul interacts with the Arduino IDE and see if I could load code directly onto my chips.
The arduino allows for different chips and configurations through the boards.txt and the programmers.txt files. Each configuration usually will also have a “core” which maps the pins and handles the particulars of that chip. When you run paul’s teensyduino installer it adds several entrys to the boards.txt file including the entry below.
teensy_ser.name=Teensy 1.0 (USB Serial)
teensy_ser.upload.protocol=halfkay
teensy_ser.upload.maximum_size=15872
teensy_ser.upload.speed=38400
teensy_ser.upload.disable_flushing=true
teensy_ser.upload.avrdude_wrapper=teensy_reboot
teensy_ser.build.mcu=at90usb162
teensy_ser.build.f_cpu=16000000L
teensy_ser.build.core=teensy_serial
teensy_ser.build.post_compile_script=teensy_post_compile
teensy_ser.name=Teensy 1.0 (USB Serial)
teensy_ser.upload.protocol=halfkay
teensy_ser.upload.maximum_size=15872
teensy_ser.upload.speed=38400
teensy_ser.upload.disable_flushing=true
teensy_ser.upload.avrdude_wrapper=teensy_reboot
teensy_ser.build.mcu=at90usb162
teensy_ser.build.f_cpu=16000000L
teensy_ser.build.core=teensy_serial
...
#############################################################
fouryou.name = atMega32U4
fouryou.upload.protocol=atmega32u4<
fouryou.upload.maximum_size=32256
fouryou.upload.speed=38400
fouryou.upload.disable_flushing=true
fouryou.upload.avrdude_wrapper=dfume
fouryou.build.mcu=atmega32u4
fouryou.build.f_cpu=16000000L
fouryou.build.core=teensy_serial
#############################################################
tooyou.name = atMega32u2
tooyou.upload.protocol=atmega32u2
tooyou.upload.maximum_size=32256
tooyou.upload.speed=38400
tooyou.upload.disable_flushing=true
tooyou.upload.avrdude_wrapper=dfume
tooyou.build.mcu=at90usb162
tooyou.build.f_cpu=16000000L
tooyou.build.core=teensy_serial
#############################################################

fouryou.name = atMega32U4
fouryou.upload.protocol=atmega32u4
fouryou.upload.maximum_size=32256
fouryou.upload.speed=38400
fouryou.upload.disable_flushing=true
fouryou.upload.avrdude_wrapper=dfume
fouryou.build.mcu=atmega32u4
fouryou.build.f_cpu=16000000L
fouryou.build.core=teensy_serial

#############################################################

tooyou.name = atMega32u2
tooyou.upload.protocol=atmega32u2
tooyou.upload.maximum_size=32256
tooyou.upload.speed=38400
tooyou.upload.disable_flushing=true
tooyou.upload.avrdude_wrapper=dfume
tooyou.build.mcu=at90usb162
tooyou.build.f_cpu=16000000L
tooyou.build.core=teensy_serial
I started with a blank script that just printed the arguments passed to the wrapper and then called it by restarting my Arduino (to reload the boards.txt) And then selecting one of the new boards and “Uploading” my code. This gave me a window to interactively work through my script. Since the avrdude_wrapper code just pretends to be an avrdude most of the script is munging the arguments passed to avrdude to get the commands to pass to dfu-programmer.
#!/usr/bin/perl
use Getopt::Std;
print @ARGV;
my %args;
my $hexfile;
my $dfu = "/usr/local/bin/dfu-programmer";
my $cpu;
my $hexfile;

getopt('pUc',%args);
$hexfile=$args{U};
$hexfile =~ s/flash:w://;
$hexfile =~ s/:i//;
$cpu=$args{c};

print "n[" . $hexfile . "]";
print "n[" . $cpu . "]n";
print "$dfu $cpu erasen";
system "$dfu $cpu erase";
print "$dfu $cpu flash $hexfilen";
system"$dfu $cpu flash $hexfile";
print "$dfu $cpu startn";
system "$dfu $cpu start 1>&2";
print "n";
There is one tricky bit. The current avr-gcc doesnt support the atmega32u2 correctly but the code for the at90usb162 is binary compatible so the build.mcu is set to the at90usb162. But then dfu-programmer supports the correct chip and wont find the device so we use the fact that the upload.protocol argument is passed directlyalong using the -c argument and everything works fine.
So now we just use the hwb and reset buttons to get the system into dfu mode and upload our code directly from the arduino. Its not as slick as the teensy in “auto” mode but it works.
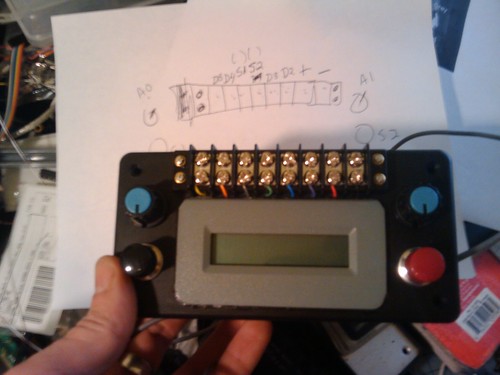
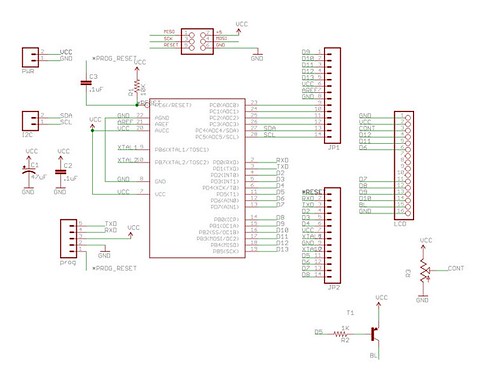
The testbox is an LCD/Dorkboard based arduino clone with two buttons and a pair of potentiometers. The switches, power and 4 io pins are made avaliable via screw terminals on the ouside of the testbox.
#include

/*--------------------------------------------------------------

pulse generator for test box
Depending on the setting of left dial send send pulses out on digital ouput pin 2
at between 1 and 122 hz when left button is pressed.
the lcd should show the hz and the number of pulses sent.
*/
//defines for analog "dial" pins.
#define D1PIN 0
#define D2PIN 1
//defines for switches
#define S1PIN 17
#define S2PIN 16
// other pins avaliable for testbox 2, 3, 4, 13
#define PULSEPIN 2
// defines for smooting (nsamples) and debounce (milliseconds)
#define SMOOTHING 16
#define DEBOUNCE 50
//defines to map pins to lcd
#define D4 7
#define D5 8
#define D6 9
#define D7 10
#define RW 11
#define E 6
#define RS 12
#define BL 5
LiquidCrystal lcd(RS, RW, E, D4, D5, D6, D7);
int d1 = 0, d2 = 0, s1=0, s2=0;
/* variables for debouncing switches and knobs */
int s1reading = 0 , s1previous = 0;
long int d1sum = 0, d2sum = 0, s1time=0;
int samples = 0;
volatile int overflowcount;
volatile int pulsecount;
volatile int pinstate=HIGH;
ISR(TIMER2_OVF_vect) {
if (s1) {
if (++overflowcount > d1) {
overflowcount=0;
pinstate=!pinstate;
digitalWrite(PULSEPIN,pinstate);
if ( pinstate ) {
pulsecount++;
}
}
}
}
void setup()
{ overflowcount = 0;
pulsecount = 0;
delay(1000);
lcd.begin(2,16); // Print a message to the LCD.
pinMode(S1PIN, INPUT);
digitalWrite(S1PIN, HIGH);
pinMode(S2PIN, INPUT);
digitalWrite(S2PIN, HIGH);
lcd.setCursor(0,0);
lcd.print(" ");
TCCR2A = 0; //freerunning timer 2
TCCR2B = (CS21|CS22); //divide clock by 256
TIMSK2 = TOIE1; //enable timer2 terrupt
}
void loop()
{
s2 = !digitalRead(S2PIN); //read s2 for grins or DEBOUNCE as below.
//DEBOUNCE s1
s1reading = digitalRead(S1PIN);
// If the switch changed, due to bounce or pressing...
if (s1reading != s1previous) {
// reset the debouncing timer
s1time = millis();
}
if ((millis() - s1time) > DEBOUNCE) {
if (s1 == s1reading) { // if DEBOUNCEd reading is a change
s1=!s1reading;
if (s1) {
pulsecount=0;
}
}
}
s1previous = s1reading;
d1sum += analogRead(D1PIN);
d2sum += analogRead(D2PIN);
if (++samples > SMOOTHING) { //when i have SMOOTHING samples then average them.
d1sum /= SMOOTHING;
d2sum /= SMOOTHING;
d1=map(d1sum,0,1023,0,122); //map dial to what you want values to be
d2=map(d2sum,0,1023,0,300);
samples=0;
d1sum = 0;
d2sum = 0;
}
lcd.setCursor(0,0);
lcd.print("Rate: ");
lcd.setCursor(6,0);
lcd.print(122-d1);
lcd.print("Hz ");
lcd.setCursor(0,1);
if (s1) {
lcd.print("ON ");
} else {
lcd.print("OFF");
}
lcd.setCursor(6,1);
lcd.print("# ");
lcd.setCursor(8,1);
lcd.print(pulsecount);
}